Plastic Bottle Garden
An easy way to start growing from home with a super simple hydroponic system. We will also be upcycling at the same time – win-win! This method is a great activity to try with kids because the system is simple to make and understand. At the end of the month, you can share with us how much your seedlings have grown!
Materials
- 1l, 1.5l or 2l plastic water bottle (with labels removed)
- Twine or fabric strips
- Scissors
- Nail
- Hammer
- Seeds/Seedlings
- Soil
Instructions
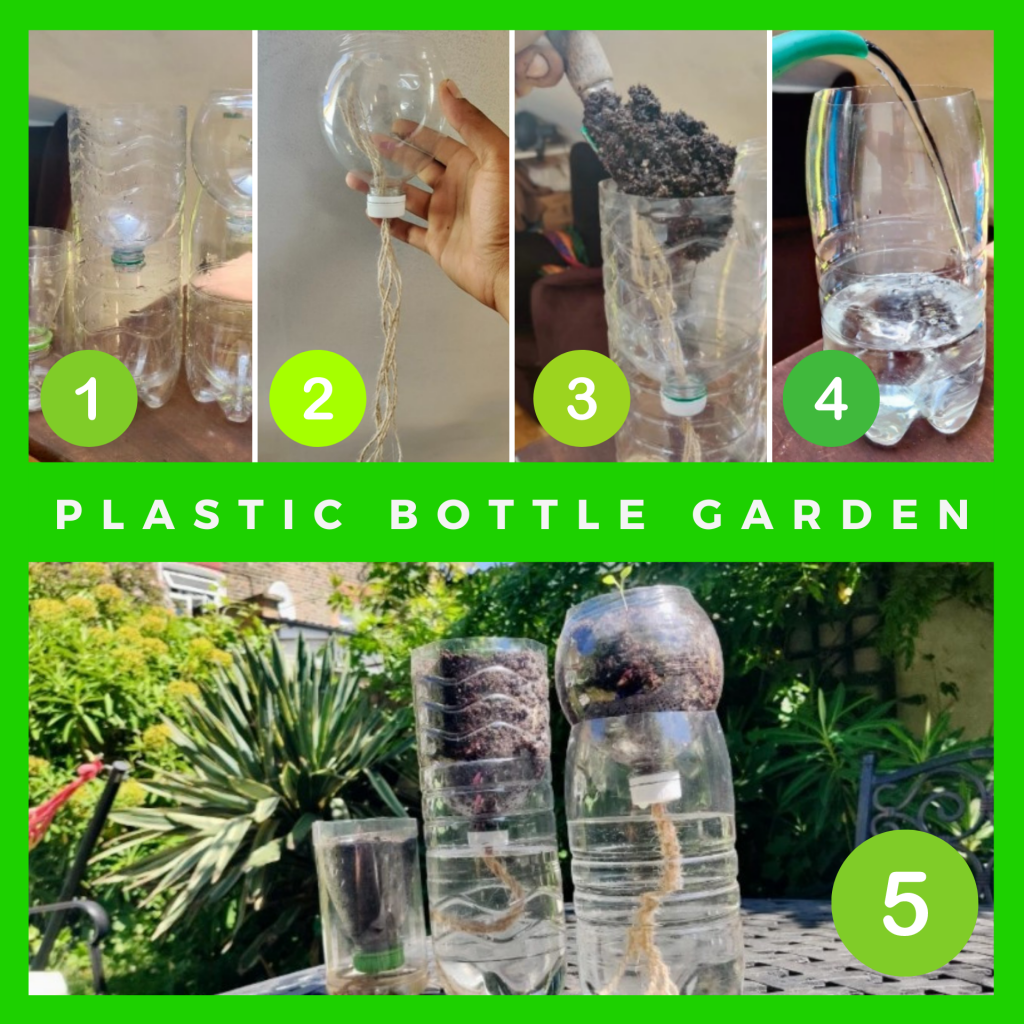
- Prepare the bottles. The first step is to prepare your plastic bottles. we used two 2-liter bottles and a 1-liter bottle. The top third of the bottle will be removed, turned upside down and filled with soil, while the bottom part of the bottle will be filled with water, acting as the reservoir. Where to cut your bottle will depend on its shape, but generally cutting it two thirds of the way from the bottom will work best. Turn the top upside down and check that it fits snugly into your reservoir (bottom part of the bottle).
- Make a hole in the bottle cap. The next step is to make a hole in the center of your bottle cap, this is so we can feed through the wicking material to sit in the water. I used a nail and hammer to make the hole. Let an adult do this part.
- Cutting and tying the wicks. The material you use as a wick can be any absorbent twine or fabric. You can even use a strip of fabric from an old t-shirt or thick cotton wick if you’d like. A general rule is to cut each piece of wick as long as the original bottle height. It is better to have extra wick than not enough as we want to make sure the plants get enough water. After cutting 6 sections of wick, I tied them all together with a knot approximately in the middle. This keeps them all together but also prevents the wick from falling through the bottle cap. Thread the wicks through the bottle caps and then screw them into place.
- Add soil. The next step is to add soil to the top of the system. Carefully pour in small amounts of potting mix, making sure to distribute the pieces of wicking material evenly across the whole area. This will ensure even watering to the plant roots in all directions.
- Fill the reservoir with fresh water. Next, fill the reservoir (bottom part of your water bottle) with water, making sure it is below the inverted bottle cap. This is so the water doesn’t have direct contact with the soil, which will cause waterlogging. Around 1cm from the bottle cap is ok.
- Sow or transplant into your new system. There are two ways you can plant into your new system, either by direct planting new seeds or transplanting a young plant. Ask if you can have seeds from any vegetable or fruit you eat at home. Bell peppers grow very fast, so do tomato seeds. Make a shallow hole in the potting mix, plant the seeds and then cover them.
- Water and place in a sunny spot. Your new water bottle growing system is almost there! All that’s left place it in a sunny spot.
Why is it important to upcycle?
Upcycling is the creative reuse of waste materials as useful products with some environmental value. Upcycling is a great way for us to breathe new life into what otherwise would be thrown away. For this project, we can use the slow-degrading property of plastic to our advantage by making a growing system that could last years.
How does growing plants in a water bottle work?
This method of growing uses what we call a ‘wick system’. It’s the most basic of all hydroponic systems, meaning it’s really easy to make. Like most hydroponic systems, it utilises a reservoir of water to feed and water the plants instead of soil.
These humble growing systems can grow anything from lettuce to kale, or any herb you like. They can also be used as an intermediary home for larger plants like tomatoes and courgettes, which will be potted outside when large enough.